
Ecommerce Shipping Guide

How to Load-Test a Shipping API Before Peak Season

Peak season is the one time of year when a shipping integration either proves itself or falls apart in public. Order volume, rate requests, label creation, and carrier traffic land in the same narrow window, and every layer of the stack is under pressure at once. The teams that survive Q4 are the ones that found their breakpoints in October, not December. This article gives you a load-testing framework that covers both sides of the integration: the upstream carrier APIs you depend on and the system you own. It is written for two readers at once. Engineers get runnable scenarios with objectives, triggers, and pass/fail criteria. Managers get the decision gate: the evidence required to sign the API off for peak season, and the signals worth watching during every run. One rule governs everything: every target number in this framework comes from your own traffic forecast and baseline measurements. No invented figures.

Logistics control room at night with rising order volumes and alert dashboards.
Find your breakpoints before the carrier's rate limiter finds them for you

Why Peak Season Breaks Shipping Integrations

Q4 does not spread extra load evenly. Order volume, rate requests, and label creation land in the same days, often at multiples of normal traffic within hours of each other.[^1] An API that copes with an average Tuesday can have zero headroom for Cyber Monday, because the peak is not a steady increase. It is a compression of the entire month into a handful of hours.

Keep the load-test boundary aligned with the Shipping API workflow overview, including the steps that happen after a quote returns. Pair the load result with the WMS integration acceptance tests so that recovery and data consistency are also checked.

Three layers fail independently, and a load test that looks at only one of them will miss most of the damage. The upstream carrier API fails with rate limits and timeouts. Your integration fails with thread exhaustion, queue backups, and lost jobs. Downstream operations fail with reconciliation gaps, duplicate labels, and a flooded support queue. Each layer has its own failure mode, its own trigger, and its own fix, which is why the scenarios in this article are organized by layer rather than by symptom.

The classic failure chain is mechanical and predictable:
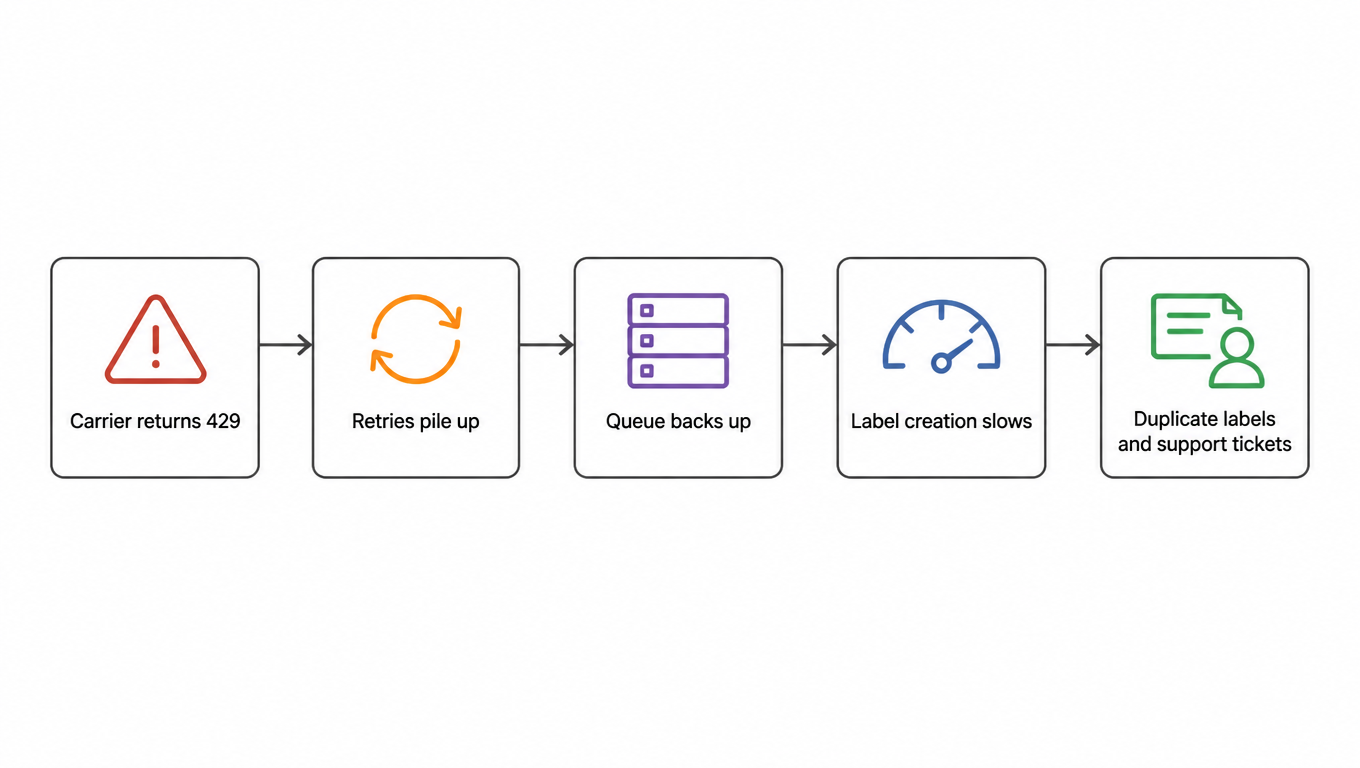
Flowchart: Carrier returns 429, retries pile up, queue backs up, label creation slows, duplicate labels and support tickets
A mechanical failure chain from rate limit to support ticket

Carrier rate limits arrive[^2], retries pile up, the queue backs up, label creation slows, and the last mile of the chain is a support inbox full of "where is my label" tickets. Every step of this chain is testable before it happens. The point of load testing is to find your breakpoints yourself, while you still have time to fix them, before the carrier's rate limiter finds them for you.
What You Are Actually Testing: Throughput, Limits, Latency

Three measurements matter, and they are easy to confuse. Throughput is how many rate requests and label creations per minute the system can sustain at an acceptable latency. Limits are how the system behaves at the carrier's documented rate limit, and just beyond it. Latency is the end-to-end time from request to confirmed label, including time spent waiting in a queue. A system can pass on throughput and fail on latency: it processes everything eventually, but labels confirm ten minutes after the customer expected them.

The order of testing matters as much as the measurements. Run throughput first, then failure modes, then recovery, then consistency. Throughput failures are the most common and the cheapest to fix. Failure-mode bugs are the most dangerous, because they only appear under real load. Recovery and consistency are about what happens after things go wrong, and they are only worth testing once the happy path is proven.

Every scenario in this article is a card with four fields: an objective, a trigger, pass/fail criteria, and an owner. The owner is not decoration. It is what makes the results reviewable by both engineers and management, because each card states who is accountable for the target and for the fix. Each card also names its data source, so nobody can quietly swap in a made-up number halfway through the campaign.

Throughput and Concurrency Scenarios

1. Rate Request Throughput

Objective: sustain the forecasted peak rate-request volume without degrading. Trigger: ramp traffic in steps from baseline up to your peak forecast, holding each step long enough for the system to settle. Pass/fail: record P95 latency[^5] and error rate at each step; fail if error rate crosses your threshold or P95 blows your budget before you reach the forecasted peak. Owner: integration lead. Data source: your own traffic forecast, built from last year's peak adjusted for growth.

2. Label Creation Concurrency

Objective: verify queueing and timeout behavior when label requests arrive in parallel. Trigger: fire concurrent label requests at and above the peak rate. Pass/fail: measure the rate at which labels are actually confirmed, not just accepted; verify requests queue instead of exhausting worker threads; and confirm that no request hangs past your timeout budget without failing fast. Owner: backend lead. Data source: baseline concurrency measurements plus the carrier's documented limits.

3. Duplicate and Idempotent Requests

Objective: prove that resending the same request returns the same result. Trigger: replay identical requests, including requests that timed out on the first attempt, using the same idempotency key.[^3] Pass/fail: no double label, no double charge, and identical responses for identical keys, every time. Owner: integration lead. Data source: the replay and timeout logs from your own throughput runs.

The expected outcome of this section is a recorded throughput ceiling per carrier and per endpoint, plus evidence that idempotency holds under replay. Those numbers become the budget for the failure-mode scenarios: you cannot judge how badly an outage hurts unless you know what the healthy ceiling is.

Failure-Mode Scenarios

1. Slow Webhook

Objective: verify that the system converges on true state when a webhook arrives late or out of order. Trigger: delay or reorder webhook delivery in the test environment while label creation continues normally. Pass/fail: status polling and reconciliation pick up the real state within your recovery window, with no manual intervention. Owner: integration lead.

2. Lost Webhook

Objective: verify recovery when a webhook never arrives. Trigger: drop a webhook entirely and leave the label in a pending state. Pass/fail: the resync or polling job recovers the label status automatically, and the gap surfaces in your dead-letter or reconciliation report rather than in a customer support ticket. Owner: backend lead.

3. Carrier Timeout

Objective: verify that the system fails fast when a carrier hangs. Trigger: simulate a carrier that accepts the request and then never responds, past your timeout budget. Pass/fail: the request aborts at the timeout boundary and moves to the retry queue instead of tying up a worker thread; threads are released promptly, and the queue keeps moving. Owner: backend lead.

4. Partial Carrier Outage

Objective: verify failover routing when one carrier goes down while others stay up. Trigger: take one carrier offline in the test environment and keep routing new volume at it. Pass/fail: traffic fails over to the fallback carrier or waits in a bounded queue, and the team can state how long the queue can safely wait before labels miss their cutoff. Owner: operations lead.

Recovery Scenarios

1. Retry Storm

Objective: prevent a second outage caused by recovery itself. Trigger: end a simulated outage with a large queued backlog and release all retries at once. Pass/fail: exponential backoff with jitter[^4] keeps the carrier from being flooded a second time, and your own retry traffic never exceeds the carrier's rate limit. Owner: backend lead.

2. Queue Recovery

Objective: verify a clean restart with a deep backlog. Trigger: stop the worker, let the queue grow, restart, and measure the drain. Pass/fail: draining order matches your priority rules, no duplicates are created on resume, and time-to-recover meets a target you set from your own batch cutoffs, not from a guess. Owner: operations lead.

Consistency Scenarios

1. Void and Refund Consistency

Objective: verify that the system converges when a void happens during a failure window. Trigger: void a label while the carrier is timing out or the webhook is lost. Pass/fail: both systems converge to voided or refunded within your recovery window, and no label is left in a permanently ambiguous state. Owner: finance lead together with the integration lead.

2. Billing Reconciliation After Failure

Objective: prove that the billing record matches reality after a partial failure. Trigger: compare billing events against labels actually created after a scenario in which some requests failed, timed out, or were retried. Pass/fail: no charge without a label, no label without a charge, and every discrepancy is explainable and logged. Owner: finance lead.

Portal and Admin Fallback

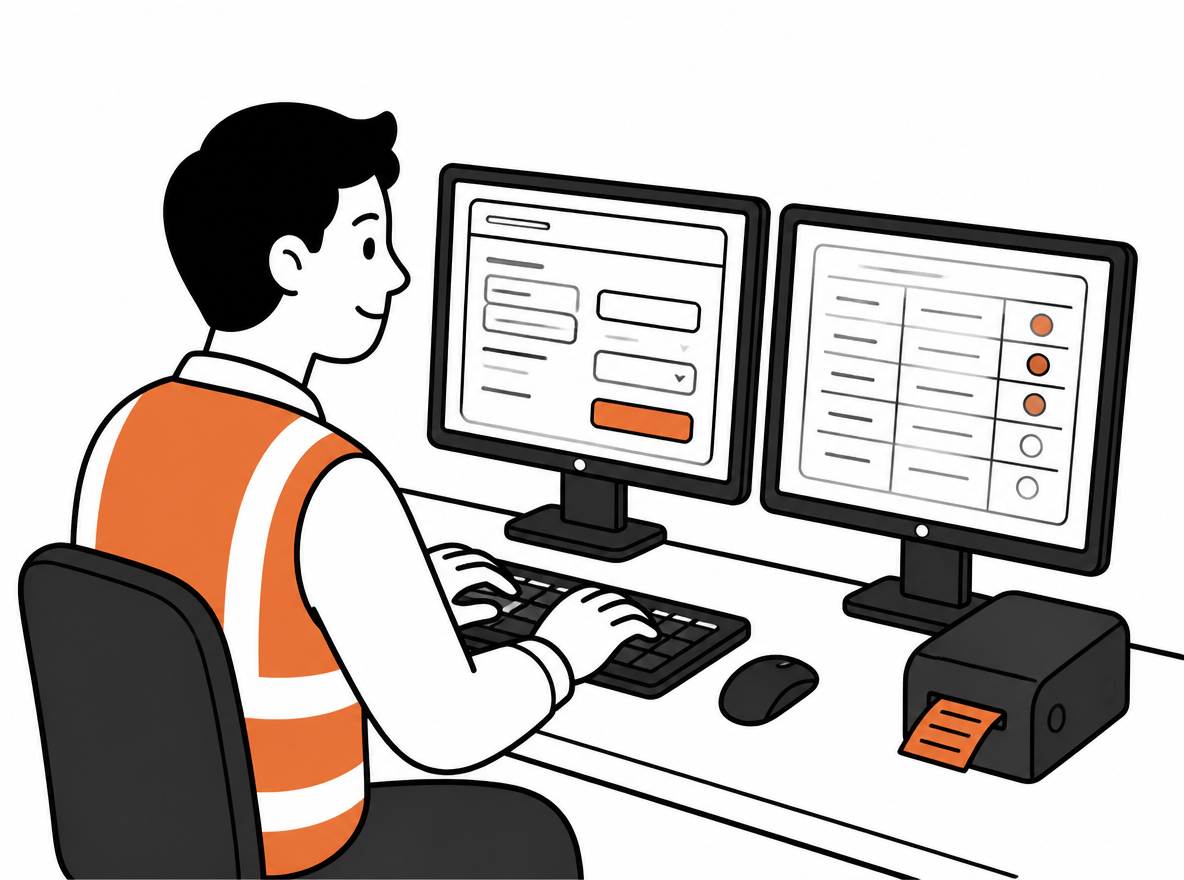
When the API is degraded, operations still need to ship. Every load-test framework needs a manual path, and it needs one that is tested, not assumed: verify the portal or admin flow for creating labels by hand, including data entry, carrier selection, and the confirmation step.

Warehouse operator manually enters a shipment beside a screen showing carrier status.
Test the fallback under load, not just once

The fallback has to be tested under load, not just once. A portal that works for a single manual user can become unusable when twenty operators lean on it during an outage, so run the fallback with the same concurrent operator count you expect at peak.

Every fallback action must be logged: manual label creation, manual void, manual rate override. If the fallback is not logged, it creates a reconciliation gap that the consistency scenarios will not catch, because the manual path bypasses the API's normal audit trail. A logged manual action is a billing event; an unlogged one is a future dispute.

Building the Test Plan and the Decision Gate

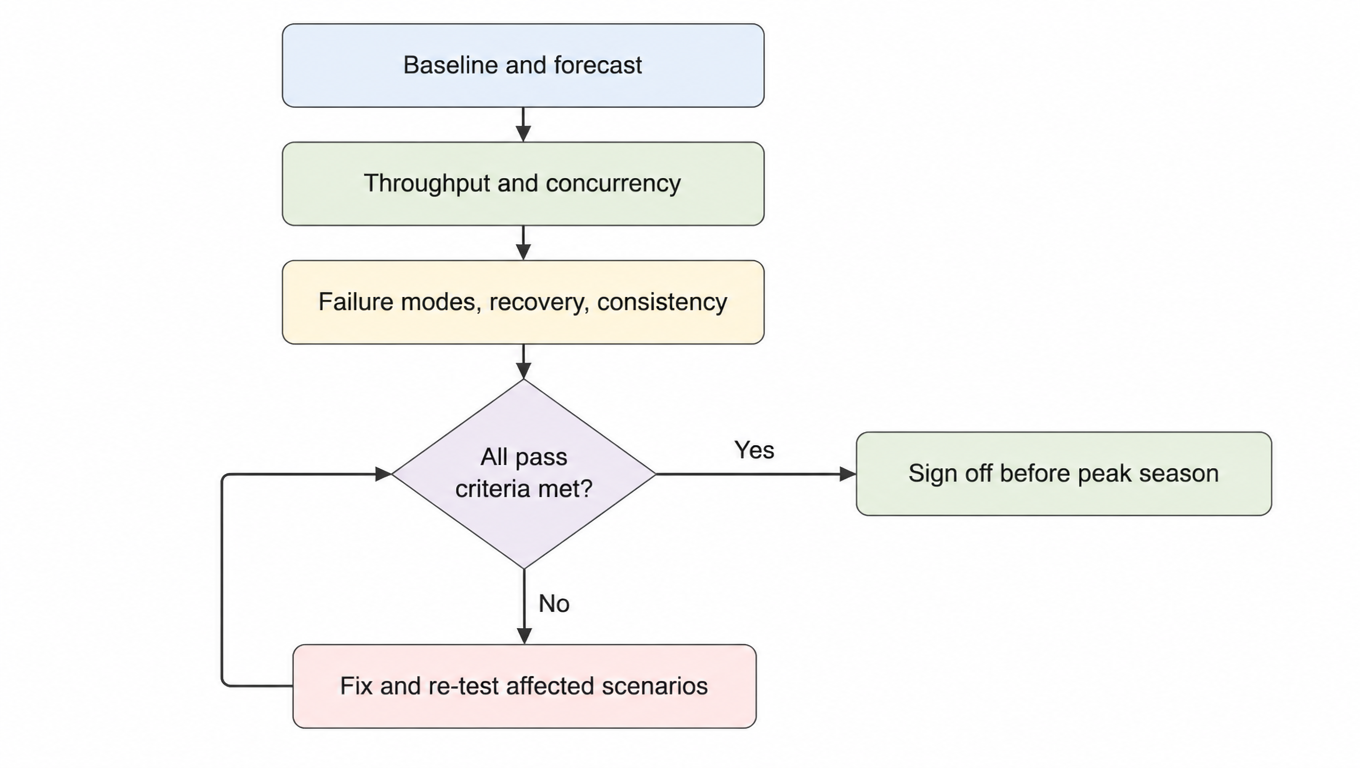
The recommended sequence is baseline first, then throughput, concurrency, failure modes, recovery, and consistency. Start by measuring current throughput, latency, and error rates on a normal day, because every scenario target is derived from that baseline and from your traffic forecast. Each scenario is a card with objective, trigger, pass/fail criteria, owner, and data source, so the whole campaign reads as one checklist that engineering executes and management audits.

Watch five signals during every run: queue depth, error rate, P95 latency, retry count, and dead-letter count. These tell you the system is approaching its edge before a scenario formally fails, and they are the same numbers to watch in production during peak.

Flowchart: Baseline and forecast, throughput and concurrency, failure modes and recovery and consistency, all pass criteria met? Yes: sign off before peak season; No: fix and re-test affected scenarios
Sign off only when every pass criterion is met

The decision gate is simple in shape and hard in practice: sign off only when every pass criterion in every scenario is met, at least one full run of the failure modes finishes with zero manual interventions, and the sign-off is a named person with a dated record. That named owner is what makes the gate real, because it turns "the API is probably fine" into "the API is ready, and here is the evidence."

After sign-off, re-test whenever anything changes: a code change to the integration, a carrier change such as new rate limits, endpoints, or cutoffs, or a config change to timeouts, retry counts, queue sizes, or concurrency pools. A re-test does not need the full sequence every time. Run the scenarios that touch the changed surface, and re-run the decision gate. Peak season punishes integrations that were load-tested with invented numbers; it rewards the ones that were load-tested against their own real forecast.

FAQ

Two baselines: your current throughput, latency, and error rates on a normal day, and a traffic forecast built from last year's peak adjusted for growth. Every scenario target in this framework derives from these two, and without them any pass criterion is a guess.
Baseline first, then throughput, concurrency, failure modes, recovery, consistency. Throughput failures are the most common and cheapest to fix; failure-mode bugs are the most dangerous and only appear under real load; recovery and consistency are only worth testing once the happy path is proven.
Exponential backoff with jitter, so your retry traffic never exceeds the carrier's rate limit. The classic trap is releasing every retry at once on recovery and flooding the carrier a second time, which is exactly what the retry-storm scenario tests.
When every pass criterion in every scenario is met, at least one full run of the failure modes finishes with zero manual interventions, and the sign-off is a named person with a dated record. After that, any code, carrier, or config change requires re-testing the affected scenarios and re-running the gate.
Because operations still need to ship when the API is degraded. A portal that works for one manual user can become unusable when twenty operators lean on it during an outage; and every fallback action must be logged, or it creates a reconciliation gap the consistency scenarios will not catch.

Want your shipping integration actually tested before peak season?

EasyShippingX operates in the carrier execution layer (rates, labels, tracking). Multi-carrier live rates, observable rate-limit and timeout behavior, idempotent and retry semantics, and failover paths across carriers let you run this load-testing framework against real production capability, not paper documentation. Baselines, scenario cards, and the decision gate: that is what accepting a shipping integration before peak season should look like.